Tuesday, August 20, 2013

Tamarind, basil and snow peas chicken stir-fry

No story behind this recipe. Just that I went to an Asian supermarket over the weekend and stocked up on tamarind paste and snow peas and wanted to play with them :)


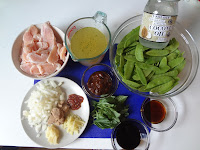
INGREDIENTS (for 4 people, or 2 people with leftovers)
- 2 large chicken breasts, sliced finely and dredged in cornstarch
- 1 medium onion, diced finely
- 4 cloves of garlic, grated
- 1 inch fresh ginger, in fine sticks
- 1 tbsp fresh chili paste (I used Sambal Oelek, but you can also use a fresh red chili of your choice and grate it into a paste)
- 2 tbsp brown sugar
- 1/4 cup tamarind paste (you can make your own out of the dried fruit: click here for a recipe, or rehydrate commercially available tamarind concentrate)
- 2 1/2 tbsp Thai fish sauce
- 3 1/2 tbsp light soy sauce
- about 1 cup chicken broth
- snow peas, rinsed (I think I had about 1.5 lbs here, but you can use as much as you want, really!)
- a big handful of fresh Thai basil
- a splash of coconut oil

RECIPE:
- in a very (VERY) hot wok, fry the onion, garlic and ginger in coconut oil for a few minutes, stirring almost constantly

- add the chili paste, the chicken and stir again until the chicken is almost cooked through (opaque), then add the soy sauce and cook for another 2 to 3 minutes

- while it is cooking, dissolve the brown sugar in the fish sauce

- after 3 minutes, add the snow peas and stir until well mixed, then add about 3/4 cup chicken broth and stir until the sauce coats the snow peas and chicken

- after 3 minutes, add the tamarind and sugar dissolved in fish sauce, and cook for another 3-4 minutes, or until the snow peas are cooked to your liking, then turn off the heat, sprinkle fresh basil on top and mix well

Note: if the stir fry is getting a bit dry, add more chicken broth
- serve piping hot over steamed jasmine rice and decorate with a few leaves of fresh basil

- Enjoy!

Sunday, August 18, 2013

Dulce de leche

Nothing simpler than making your own dulce de leche. This deliciously sweet ooey-gooey marvelousness that is dulce de leche can be yours for only 2 dollars, in less than 3 hours!

Also, if you've never had it, you HAVE to try it :)


INGREDIENT(S):
- 1 can of sweetened condensed milk


RECIPE:
- remove the label of the can and rinse it well
- submerge the can, unopened, in a pot of water and bring to a boil (making sure that the water level is always about 1 inch above the top of the can)

- lower the heat and simmer for 90 minutes to 2 hours
- let the can cool before you open it and transfer the milk into a sterilized glass jar; it is now a beautiful golden color and has a gooey creamy texture

- dulce de leche keeps for forever in the fridge, but I'm not sure this has been scientifically proven, since it is litterally impossible not to finish the jar in a few days :/
- you can serve this on toast for breakfast, in yoghurt, with bananas and oatmeal, as a sweetener for coffee, on fresh apple slices,... pretty much any way you'd like! this is such a versatile treat :)

- can you guess how I'm going to have it?

Healthy cucumber salad with dill cream vinaigrette

You know those days when you know you've been abusing the calories all week long but you're still hungry and you still need to eat? Well, look no further, I've got the perfect recipe for you! Try this cucumber salad with a dill cream vinaigrette, you won't be sorry.

Plus, it's super healthy and makes you feel good about yourself :D


INGREDIENTS (for 2 people):
- 1 large cucumber
- 1handful of fresh dill
- 1/3 cup light cream
- 2 tbsp apple cider vinegar
- salt and pepper to taste


RECIPE:
- slice the cucumber thinly

- mix the vinegar and cream (the cream will curdle into a thicker consistency, almost yoghurt-like; that's absolutely normal!) and add the chopped dill and stir well

- douse the sliced cucumber in the cream sauce, salt and pepper and mix until evenly coated

- serve sprinkled with a little paprika, with perfectly fried eggs and toasted pumpernickel bread for a super healthy lunch or light dinner

- enjoy!

Monday, August 12, 2013

Ras el hanout chicken meatballs and israeli couscous stew

The inspiration behind this post came about two days ago, when Virginie at Chefnini (if you don't know her yet, she is an amazing cook! She posts exclusively in French however) posted an entry on couscous-flavored meatballs. Couscous as in the north-african stew dish, not just the grain, of course! I thought this was such a genious idea that I decided to adapt it to the pound of chicken I had waiting to be transformed into deliciousness in the fridge.

Here's what I came up with, with whatever was around in my pantry.


Note: Sorry guys, no step by step photos for this one. I concocted this on a whim, with no natural day light so there was no point... Still, hope you will try (and like) this recipe!

INGREDIENTS (3-4 people):
- 3 chicken breasts
- 1 shallot
- 3 garlic cloves
- 2 tsp ras el hanout (click here for a recipe)
- salt and pepper to taste
- 1tsp ground cumin
- 1/2 cup whole wheat flour (more or less, depending on the moisture level)
- 1 egg
- one 15oz can of diced tomatoes
- 1 to 1 1/2 cups vegetable broth
- 1 cup israeli couscous
- fresh cilantro

RECIPE:
- chop the shallot, garlic and chicken very finely with a food processor (or meat grinder if you're lucky enough to have one!)
- add an egg to the mixture and mix thoroughly
- add the spices, salt and pepper and adjust moisture level with the flour, until you are satified with the texture
- form into small meatballs and dredge in flour
- brown the meatballs in a little bit of olive oil and butter, over high heat
- when the meatballs are golden brown (but still raw inside), add the can of tomatoes with the juice, the broth and israeli couscous
- bring back to a boil, lower the heat and simmer covered on low for about 15-20 minutes, or until the meatballs and couscous are cooked through
- if the stew gets too dry before the couscous is cooked, add some warm water (I personally like this stew a bit on the liquid side)
- serve piping hot and sprinkled with chopped fresh cilantro
- enjoy!

Roasted poblano cream and Mahi-mahi tacos

First off, apologies for the crappy photo quality. I made this in the evening, with no natural light and no blogging aspirations, but it turned out to be so delicious, I just had to share!

Now that that's out of the way, let me tell you of my love for poblano peppers. As a European, I must say poblanos have been one of the most eye-opening culinary experiences I've had since I moved to the US. They have a particular smokey flavor that I just cannot get enough of! Especially when they are roasted on an open flame.

Now, I don't know about you, but they are not readily available in my regular supermarket, so when I found fresh poblanos at the farm produce stand at work last week, I took advantage and stocked up.

This is what I came up with that very same evening.

Enjoy!


INGREDIENTS (for 2 people, or 1 with leftovers)
- 1 pack of frozen mahi-mahi bits, thawed (very affordable - I found mine at Trader Joe's for less than 4 dollars)
- 1 large shallot, diced very finely (you can use onions, but I had shallots on hand)
- 3 cloves of garlic, diced very finely
- a handful of cilantro, chopped
- 1 poblano pepper, charred on an open flame, peeled and chopped in large chunks (make sure to remove all pits and membranes, as this is where most of the heat is)
- 1 cup chicken broth
- 1/2 cup light cream (any liquid cream, sour cream or even greek yoghurt will work too)
- a splash of olive oil
- salt pepper to taste


RECIPE:
- in a medium pan, heat a little bit of olive oil and gently fry the shallot and garlic over medium heat for a few minutes until transparent (do not brown)

- then add the poblano chunks and chicken broth, and simmer for a few minutes on high heat, until the pepper is almost cooked through

- add the cream and cilantro and simmer for another 2-3 minutes, until the cream thickens a little and the poblano is soft and completely cooked through

- using an immersion blender, puree until smooth

Note: if the mixture is still too liquid for your taste, transfer back into the pan and cook over medium heat until thickened to satisfaction 
- serve grilled mahi-mahi bits over a whole wheat tortilla and a bed of lettuce and tomatoes, doused in the poblano cream sauce
- de-lish!

Sunday, August 4, 2013

Himalayan salt block seared scallops and buttered garlic spinach

I haven't been this excited since the arrival of Piotr the Kitchenaid!

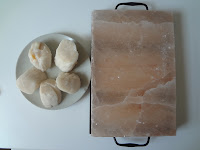
A couple of months ago, I got a super duper dorky-cool himalayan salt block for my birthday and I'm christening it today!

I decided to celebrate the awesomeness of owning such a cool gadget with seared scallops and buttered garlic spinach.

Enjoy!


INGREDIENTS (for 1 very excited kitchen dork):
- 5 scallops
- a splash of olive oil
- a handful of fresh spinach
- 1 tbsp butter
- 1 crushed garlic clove
- pepper to taste
- a cooking grade salt block
- NO EXTRA SALT


RECIPE:
- gradually heat your salt block on a gas stove (20 minutes on low, 20 minutes on medium, 40 minutes on high)

- it is normal at this point to observe discoloration of the salt block

- pat dry the scallops and lightly brush with olive oil and sear on the hot salt block (about 5-7 minutes per side), reserve on the side

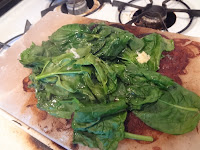
- melt the butter on the block and deglaze as much caramelized juices as possible before adding the spinach and as soon as it begins to wilt, add the garlic and toss

- serve the scallops on a bed of spinach and add pepper to taste

- Bon appetit!